Downloading Sources of Required Libraries with Scala and SBT

This one is mostly a reminder to myself, as I keep forgetting what needs to be done, to download the sources of required Scala libraries into Eclipse.

Assumption One: You are already using SBT to build your project.

Assumption Two: You are already using sbteclipse to create eclipse project files.

And then: Add EclipseKeys.withSource := true to your build.sbt (more about Settings)

Einfach und effizient loggen in Scala

Seit fast zwei Jahren gibt es nun schon die Simple Logging Facade for Scala (SLF4S) von Heiko Seeberger bei github. Die Bibliothek legt sich als dünne Wrapper-Schicht über die bereits weit verbreitete Simple Logging Facade for Java (SLF4J) und bietet gerade in Punkte Einfachheit und Effizienz nochmal einen Mehrwert.

Die Benutzung von SLF4S könnte kaum einfacher ausfallen. Um einen voll funktionsfähigen und vorkonfigurierten Logger in einer eigenen Klasse zu bekommen, braucht man nichts weiter zu tun als das Logging Trait einzumixen. Auf dem so konfigurierten logger kann man dann die bekannten Methoden info(), warning(), error() etc. aufrufen.

class MyClazz with Logging {
logger.info(“Construction of MyClazz”)
}

Erfreulich dabei ist, dass die übergebenen Parameter erst dann ausgewertet werden, wenn tatsächlich geloggt werden soll. Im nachfolgenden Beispiel werden die teuren Methode someExpensiveMethod(42) und someHugheobject.toString nur ausgeführt, wenn der debug level auf dem logger eingeschaltet ist.

logger.debug("My values = " someExpensiveMethod(42) + " / " + someHugeObject.toString)

Zusammenfassend kann man sagen, das mit SLF4S eine sehr elegante und leicht zu bedienende Lösung für Logging in Scala existiert.

Double Challenge #3 – Play!

It’s December already, which means it is time for the last double challenge of the year and a quick retrospective.

Retrospective:

November’s double challenge was pretty much successful. I’ve taken care of almost all Christmas presents (only minor things are missing) and have read the aimed 250 pages in my Scala book. With that preparation I think I am ready for the next steps in Scala… so here is the goal for this month.

Upcoming double challenge:

  • Deploy a simple Play! application, written in Scala, to Heroku. Why? Recent announcements indicate that the three topics will have a bright future together.
  • Do not drink any sugared/sweetened beverages until Christmas. Let’s find out how many drinks are actually full of sugar…

Double Challenge #2 – Christmas and Scala

It has been a bit more than a month since I ‘ve been writing about the first double challenge. Thus, I think it is time for a short retrospective and a call-out of the next challenges.

Retrospective:

The first double challenge was only half a success. Cutting down meat consumption to three days a week has dramatically reduced my overall meat consumption. It wasn’t easy, but I can absolutely recommend this model (maybe start with two or three meat free days a week). I will defiantly stick with the four meat-less-days-a-week model for a few more months.
The technical challenge on the other hand was not that successful. Unfortunately, I couldn’t really find the time to get an application running on cloud foundry. Well, I got quite far with that (it is quite easy), but finding the time to write a tutorial about it was pretty much impossible. Fortunately, some good tutorials about this topic are already existent.

Upcoming double challenge:

  • Buy all Christmas presents until the end of November. Why? To escape the pre-christmas stress! Man, I hate shopping in December.
  • Work myself through another 250 pages of my beloved Scala book. (And write heaps of Scala code on the way.) Why? Scala! 😉

First Dobule Challenge – Less meat, more clouds

I am quite a fan of Lars Vogels’s Challenge of the Month. That is why I decided to introduce a similar category on my blog. But, as I don’t want to be a typical European copy-cat, I will do it slightly different. Every month I will set up a double challenge for myself. Including one IT concerned challenge and one non-IT concerned challenge. By doing this, I hope it will a) improve my writing, b) improve my IT-skills and c) improve some other areas in my live.

So my first double challenge will be:

ISO-3166-1 Country List as SQL Script

How often do you need a drop-down in your application that displays all countries? And in most cases you need it in more than one language, right. I’ve been there a couple of times and finally decided to publish an sql script that could be used to create a countries table and fill it with all countries according to ISO-3166-1.

It took me some time to scan different sources and create my own countries.sql. And that was the main reason for setting up this post, I couldn’t find a page or blog post that had a ready-to-apply SQL script. When I was looking for the spanish translations, I finally stumbled upon Mega Database and its wonderful lists of everything. So you can either go to their page and get your own export of the data, or simply download the script I have attached to this post.

Thanks to http://www.mega-db.com.ar for the lists and enjoy displaying those country drop-downs.

Absolute First Step Tutorial for Amazon Web Services

I am currently playing around with Amazon Web Services (AWS) to get some hands on experience in the cloud. Today I would like to share some of the gained knowledge about the first steps with AWS. This tutorial will mainly cover setting up an EC2 instance backed up by an EBS storage and how to work with that instance.

Time to sign up

Amazon is giving away some free stuff to new customers. Among those is a Amazon EC2 Linux Micro Instance that can be opearte 24/7 for a whole year, as well as 10 GB of Amazon Elastic Block Storage and some I/O opeartions on it. Basicly, they are giving away all you need to get a 100% free look into parts of AWS. So if you don’t have an account yet, sign up here.

Create a new instance

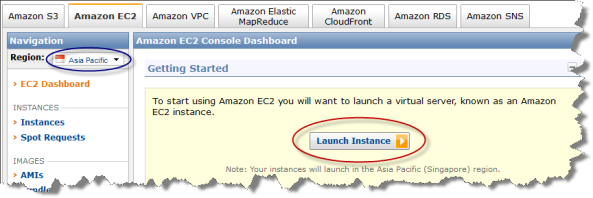
Now it is time to launch a new instance. Open the AWS Console and select the EC2 tab. Select your desired region to launch the instance within (blue circle) and afterwards click on launch instance (red circle).
Next, select the Basic 32-bit Amazon Linux AMI and continue.

In the following screen switch the instance type from a Small Instance to a Micro Instance. Leave the other options with their defaults and continue.

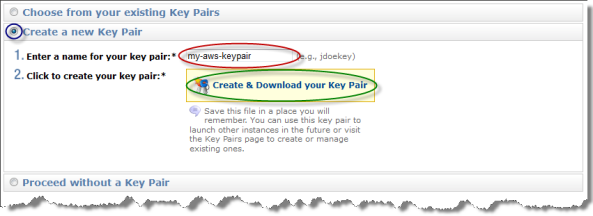
Neither do we want to change any advanced settings nor add any tags to the instance. Thus, skip the next two dialogs (click continue twice), till you reach the key-pair dialog. As we haven’t created any key pair yet, we will do so now. Select Create a new Key Pair (bule circle), type in any appropriate name for the key pair (red circle) and click on Create & Download your Key Pair (green circle). This will generate a new key pair and you will be asked to store it on your machine. Do so!
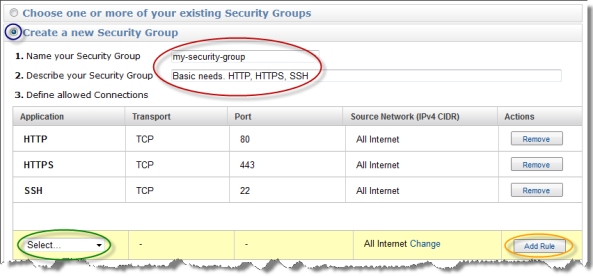
The next thing you need to do is set up a security group for the instance. As we don’t wont to go with the default one for now, you need to create a new group. Select Create a new Security Group (blue circle), give it an appropriate name and description (red circle). You need to define some allowed connections. Select HTTP from the drop-down (green circle) and click on Add Rule (yellow circle). Repeat the last step for HTTPS and SSH, so you end up with all three rules added to your security group. Click on continue to create the group.
On the final screen you are able to review all your inputs regarding the instance. A click on Launch will start the instance, which in fact will take a couple of minutes (sometimes only seconds). If you refresh the My Resources panel in AWS console your newly created instance as well as the created EBS storage, key pair and security group will show up eventually.
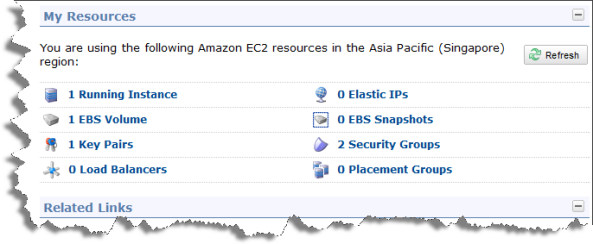
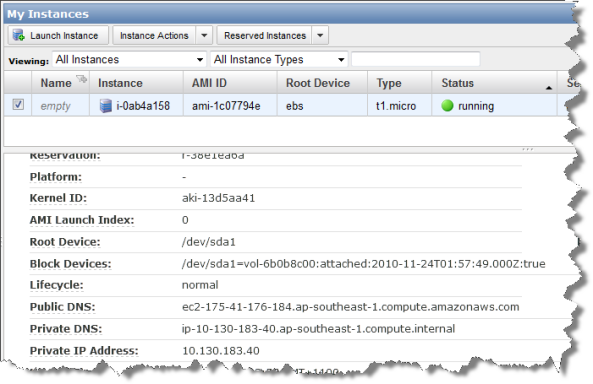
If you click on 1 Running Instance it will take you to the My Instances screen, where you can select your new instance and see all its details. Among these details is the Public DNS, note it down for later use!
Connecting to the instance

Once your instance is running, you might connect to it via SSH. If you are using Unix/Linux, I probably don’t need to tell you how you do that, just take the the public DNS and ssh to it. On Windows systems you might want to use Putty to get an SSH connection to your instance. On Keyword Intellect is a great blog post how to do that, so I wont repeat it here. One thing to add, make sure to log on as ec2-user not root.

Installing Apache HTTP Server on the instance

As an example we are going to install the Apache HTTP Server on the instance. Type the following line to install Apache and reply with y to all questions popping up.

sudo yum install httpd

After the installation is completed type the following statement to start Apache.

sudo /etc/init.d/httpd start

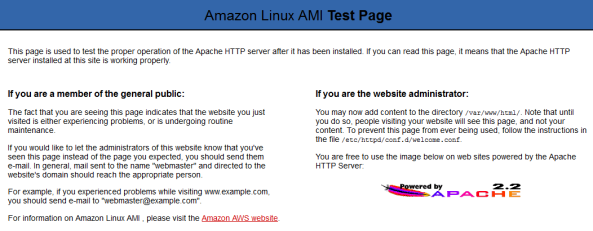
Go with your web browser to http://$YOUR-PUBLIC-DNS. You should see a page similar to the following. So now you know how to get started with Amazon Web Services, it is time for you work with your instance now. Enjoy!